~ PAINTING GUIDES ~

Painting 1/72 plastic figures: Ancient Spanish Cavalry from HAT


Spanish cavalry

0 - Introduction

This little guide started life many years ago as a post on an English newsgroup, in reply to a request for tips on painting plastic figures, which at the time had a considerable amount of positive feedback, despite my err… "creative" use of the language... so when sometimes later I saw a similar request on an Italian newsgroup I felt motivated not only to translate it but to add to it some more detail and the latest buzz… then I felt that it was unfair for the non Italian-speaking people to have access to only a somehow cut down version of it, so I went ahead and translate it back to English...
I'll spare you the story of all the other incarnations it went through, but let's say people like it and gave me a lot of positive feedback as well as many good ideas that were eventually incorporated into it. This encouraged and motivated me to keep improving it and the latest version in Italian has been published last summer on the excellent Italian wargame magazine "Dadi & Piombo". For that edition I made several pictures, and so now I thought that it would be nice to post an English version of it, and what better place than here on Plastik Kornar... Well enough fluff already, let's get on with it!


painting HAT spanish cavalry

1 - Issues with soft plastic

There are two basic issues that traditionally has been considered as "major problems" with plastic figures: first of all the kind of plastic the soldiers are made of (is called Polyethylene) is nearly impossible to glue; second, and again because of the material properties, the surface doesn't take the color well, and moreover is flexible, which puts the color film under extreme mechanical stress which can easily ruin a paint job that may have taken hours of dedication! Fortunately both these issues are easily overcome if you know how, and this is exactly what this guide is about!


2 - Gluing polyethylene

Until very recently this was indeed a serious problem, many solution have been developed that give a half-satisfying result, but all are very fiddly, require considerable skill and still did not manage to make that much of a very strong and durable bond. Luckily science has come to our help once again, in the form of a new product, specifically developed to glue soft plastics including polyethylene, which lo and behold, works perfectly! It's called PLASTIX and it is produced by Loctite, you can find it in any DIY center. It's extremely simple to use, it consist in a small bottle of a fluid which you brush on the parts and a tube of adhesive very similar to cyanoacrylate (Superglue). The bottle has an applicator brush in the cap and the fluid dries almost immediately, but the best thing of all is of course that the glue has an excellent hold, just try it, and whatever method are you using now you're not going to get back at it! I've been told that in the US of A it is available at Target, KMart etc.

painting HAT spanish cavalry


painting HAT spanish cavalry

3 - Primers

Now that we have assembled our figures it's time to paint them. Harder than metal? Not really. If you ever tried to paint plastic soldiers you may have been frustrated by the difficulty to get the color to stick to the figure in the first place, not to mention the facility with which the paint flakes off even if you manage. But don't worry, there is a trick! There are a few actually... :) Let's start with the undercoat, that is the preparation coat, which will get the color to stick to the plastic easily. On metal figures or models of rigid plastic you can use any spray "primer" with excellent results, but this doesn't work on soft plastic figures, apart anything else they bend and the normal primer film cracks very easily.


Here again this problem has now been simply overcome by a new generation of products, generally marketed as "plastic primers" which are specifically engineered for soft plastics. They ensure an incredibly strong hold and the flexibility to bend with the figure without cracking. Probably the most commonly used are Krylon® Fusion and Rust-Oleum® Specialty Plastic Primer, but there are now many others which I'd guess are equally good, like Tetrosyl® Plastic Primer for example. These products have really excellent properties and are very easy and fast to use as any other spray primer. They are however considerably expensive, and if you are of the paranoid type, they may even have as yet unknown effects on the plastic after several hundred years, who knows? A much cheaper, safer and equally valid solution, tried, tested and selected by hundreds of modellers around the world is the good old PVA, aka White Glue.


4 - cleaning

Whatever sort of undercoat you decide to use, first of all you should always wash the figures before prime them. This is because generally the plastic surface is still coated with the residues of the release agent used to help them to detach from the mould. Some may have more and some less, but you're better off giving them a good scrub with a stiff brush, hot water and a strong detergent anyway!

painting HAT spanish cavalry


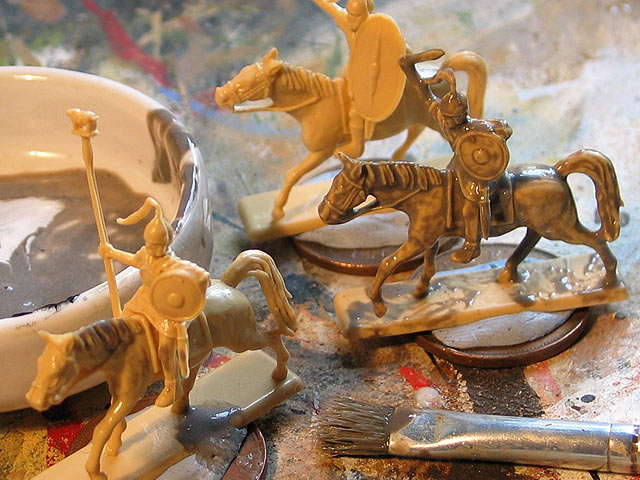
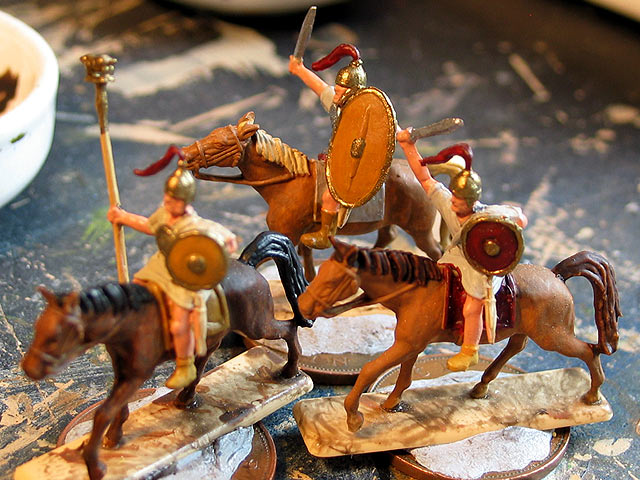
5 - mounting the figures

Once you have washed up and dried well the sprues (you can use an hair drier to speed the process, taking care not to melt the figures with the excessive heat!) you should mount them on a temporary support to handle them easily while you paint them. There are several schools here and almost everyone has his preferred technique, from attaching them to wooden sticks to even leaving them attached to the sprues. To me the only system that really works is mounting them individually, so I can go around the figure easily, but it's a matter of personal preference of course! I generally use a bit of blue tack to stick the figures to a coin, two pence works best for me. A good alternative I still use is to permanently glue them to smaller coins, (one pence/cent) and actually leave it under the figure when basing it. This has the advantage to add weight to the figure, giving it much more stability.

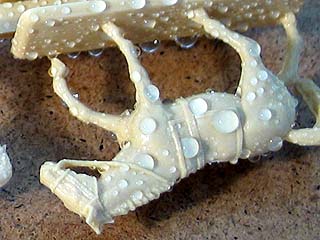
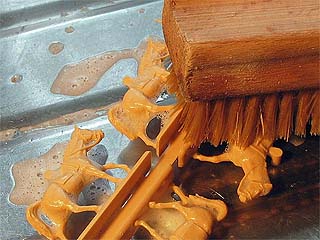
6 - Undercoating with PVA

An excellent and cheap undercoat can be made using common white glue or PVA. The most important thing here is to get the right consistence, the best method is to put some glue in a small disposable container and then add a single drop of water at a time until you get a running but still thick density. I also add a little of dark brown or black acrylic color to the mixture, it helps to see the PVA which is otherwise quite transparent and also underline the details which is a good help in painting! Using a rather large and cheap brush, with a flat head about 10mm wide, give a good wash to all the figures, completely covering them in the mixture. If it sticks to the figure is too dense, if it dribble off immediately like water on a glass is too liquid. If you do about twenty figures at a time by when you have done the last one the first is ready for the second pass. You'll see that most of the glue will have slowly run off the figure, leaving a nice coat on it. The only problem is this coat is not uniform, because the glue tends to pool in the grooves, risking to hide the finest details. All you have to do is to give them a second pass now, with the same brush but this time completely dry. You'll see that the coat of glue on the raised parts is beginning to dry by now, but where it has pooled is still wet, and will be removed by the dry brush leaving only a thin even coat on all the figure. Just dry the brush in a piece of cloth between a figure and the other or what you remove from one will end up on the next! At this point the undercoat is complete, the whole operation should take only a few minutes and after you have left the figures dry for a few hours you'll be ready to paint them.

painting HAT spanish cavalry


7 - colors and brushes

There are several kinds of colors available, and broadly they can be divided in water-based and enamels. Water-based are generally easier, cheaper, safer and give perfectly good results, so I won't discuss enamels here. Nothing wrong with them, just beyond the scope of this small guide, I may do another article on oil paints and enamels another time… Back to water-based, my preference goes to acrylics as they become waterproof as soon as they dry, which means that next coat will not disturb what's underneath. Some people prefer watercolours but again that's a different technique, and we'll leave it for another time. Even with acrylics there are several different kinds, from very fine artist liquid colors made for airbrush to cheap and thick wall paint. Prices obviously vary enormously between these, but the important thing is to use what's right for the job. With miniature paints especially is common to have say a good red color in a series, but then a better blue in another manufacturer's range, or as good a one for half price, so don't be afraid to pick and mix! My personal preference is to use "miniature" paints as base coat (Vallejo are probably the best ones around) and artist colors (Liquitex is my favorite) for shading. This is because artist colors have to be diluted and are relatively transparent, so for base colors, which need to be as covering as possible, "miniature" paints are best. Artist colors however use by far the best quality pigments and they are cheaper; the tones are more luminous and intense and they give the best results. As for brushes for my money the best you can buy are Windsor & Newton series 7, they are not cheap but they are worth what you pay them!

painting HAT spanish cavalry


8 - painting technique

Now everyone ends up developing his own technique, which is the best for him. I have found a basic system that is relatively simple and gives good results, and I tend to use it all the times now, so this is the one I'm going to share with you. It doesn't necessarily means it's the overall best ever or any other is "wrong"; it is simply what works best for me, and as it speeded up my painting considerably I hope it may be of interest to you too. The main "trick" is to paint the figures as if you were dressing them, from the bottom up. Start from the layer most underneath, usually the skin. Use the largest brush you can for the job (I tend to use a number 2 for this), don't worry about having paint going all over the figures, that's fine. Once the bottom layer is done you'll pass on to the next, this time taking care to the edges with the skin, but again otherwise splashing liberally. Layer by layer you'll do all the figure, but in this way you only have to worry about one edge at a time, which really speed things up considerably! I usually do skin, clothes, wood and metals, in this order. Keep the color much lighter than you want it as final effect, for instance for skin a light Caucasian pink at this stage works well even for the darkest flesh tones. If you do at least a dozen figures at a time by the time you've done the last one the first one will be dry enough for the next pass. Don't bother with any detail, at this stage only do the main masses. I found miniature colors are best for this base coat. Once you have finished the base colors it's better leave the figures to thoroughly dry for at least eight hours.


painting HAT spanish cavalry


9 - washes

The next phase is washes, which give depth and add realism to the colors, and also underline the details. Because of the reduced size of scale figures real shadows are practically unnoticeable, that's why by painting the shadow on the figure you considerably increase the impression of realism. For each of the colors you have applied as a base coat do a wash with a "shadow" of the same tone but much darker, considerably darker than the final effect you want to achieve, let's say half way between the base coat and black. For instance on the light pink we used above for the skin I use an orange brown, the color of tea. If you use a slightly denser and darker wash, the color of coffee, on the same base you'll get a pretty convincing Negroid skin. For metals I use pure black for iron and a rich, dark peat brown for bronze. Keep the color very runny, the consistence of water, I find artist's colors the best for this operation, they're cheaper and much better quality than the so-called "inks" sold for miniatures, and they're matt. Using again a fairly large brush liberally paint the shadow on top of the base coat, taking care not to have too much color on the brush at all times, or you'll end up washing the whole figure! The liquid favorite will run on the figure's uneven surface and will pool in the grooves, creating a nice quick and easy shaded effect. You can repeat the wash if you find the result is still too light, but make sure it is well dry first.


painting HAT spanish cavalry


10 - Drybrushing

Another fundamental technique to paint miniatures is "drybrushing", basically the opposite of washes. It brings up the raised details on the model adding an highlight easily and quickly. Use an old cheap brush, not too big because it's difficult to control where the color goes, but don't worry too much as a little highlight generally works well everywhere. Keep the favorite for this very dense and very light; let's say half way between the base coat and white. Once you have made the favorite take a tiny amount on the tip of the brush and then pass it several times on a piece of cloth or of paper until it's almost completely dry, then brush it very gently on the figure. At first it will look like nothing's happening, but brushing it on two or three times and you'll see that the raised parts of the model catch a bit of favorite, giving the highlight effect. To drybrush on metal I use silver for iron and gold for bronze. This works better on relatively large areas with a strong texturing in relief, like scale armour for example. For small or flat areas where drybrusing would only make a mess use a favorite half way between the base coat and that for drybrushing and with a fine brush paint little daubs of color on the raised or more central parts, leaving the darker tone underneath near the edges.


painting HAT spanish cavalry


11 - Details

Washes and drybrushing, alternated, can be repeated as many times as you like, each complement the other and generally the more passes you'll do the more realistic the effect you'll get. In practice however a single pass is often enough for a pretty good result and anything more would be lost anyway in the general look once the figures are based and all, but of course is up to you when to stop! At this point you're only left with the small details, and how much work this is it depends on what figures you're painting. As a rule of thumb, the more details there are (like Napoleonics for example) the less time you should spend in the passes we've seen so far. For figures which have very few details, like semi naked ancients or tribal, modern uniforms (excluding mimetic patterns of course!), cloaks, horses, etc. washes and drybrushing will do most of the job for you. To paint details you really need a good quality fine brush, a 0, 00 and even 000 are ideal sizes. If your budget allows for only a single good quality brush make it this one: for anything else you can do with more economical products, but here the difference is really worth it. If you want a very good effect you can paint all details with the appropriate favorite but very dark, then pass them again with a lighter shade at the centre, leaving a border of the darker tone all around. A much faster alternative that still gives a pretty good result is to paint the details the right color and then do a wash with black on top, or if you prefer a brighter result do a black wash first and then touch it up with the appropriate favorite.


painting HAT spanish cavalry


12 - protective coating

Now that you have finish your figures you better make sure all that work doesn't peel off the first time you use them! If you washed the plastic well and done a proper undercoat the paint will be holding on relatively well, but especially on small bits that may bend a lot it's still possible that the paint film cracks and flakes. To avoid this all you need to do is to give them a good protective coat. There are a large number of suitable products on the market, ranging from really gloss (the toughest) to nearly matt, both in spray and paint on form. If you base your figures and you handle them by the bases usually a single matt coat is enough and looks best, my favorite is Humbrol's Matt Varnish for this, but is not available as spray as far as I'm aware. If you want extra protection you can give them a coat of spray gloss varnish and once is very well dry a couple of coats of matt will considerably reduce the shine. If you do this, when you brush on the Humbrol's Matt Varnish you can avoid the metal creating a very nice contrast. If you plan to subject your figures to some serious abuse you can give them a couple of coats of gloss first followed by two or three of matt, which will protect your figure even when you drop it into a pizza and you need to wash it. If you really want to be extreme there is PLASTIDIP from PERFORMIX, a product that creates a thick gloss protective skin on your figures, so resistant that apparently if your dog chews them you can put them in the dishwasher and get them back as new… I haven't tried this myself however, you're warned!
And with this we're at the end of this article, so thank you for reading this far and please feel free to send me comments, corrections, suggestions and updates!

Cheers.
Claudio


Back to INDEX


Disclaimer: all text and images are copyrighted. Please contact me if you want to use them. Unauthorized use may be prosecuted.